Difference between revisions of "NRF9160 modem firmware"
Jump to navigation
Jump to search
| Line 3: | Line 3: | ||
# Download v1.3.2 of the nRF9160 SiP modem firmware from: [https://www.nordicsemi.com/Products/nRF9160/Download]. | # Download v1.3.2 of the nRF9160 SiP modem firmware from: [https://www.nordicsemi.com/Products/nRF9160/Download]. | ||
# Download and install nRF connect for desktop available at: [https://www.nordicsemi.com/Products/Development-tools/nRF-Connect-for-Desktop/Download?lang=en#infotabs]. | # Download and install nRF connect for desktop available at: [https://www.nordicsemi.com/Products/Development-tools/nRF-Connect-for-Desktop/Download?lang=en#infotabs]. | ||
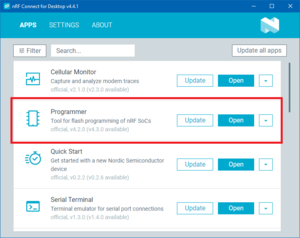
| − | # Open nRF connect for desktop, install and then open the Programmer tool: | + | # Open nRF connect for desktop, install and then open the Programmer tool: [[File:Ncfd.png|thumb | nRF connect for desktop]] |
| − | [[File:Ncfd.png|thumb | nRF connect for desktop]] | ||
# Connect the nRF9160 to the computer via a segger j-link. Ensure that the nRF9160 is powered. | # Connect the nRF9160 to the computer via a segger j-link. Ensure that the nRF9160 is powered. | ||
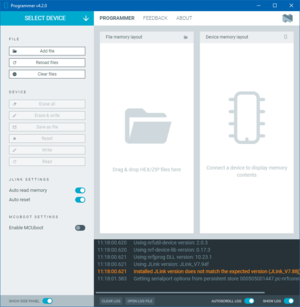
| − | # Select the j-link probe from the drop top-left drop-down menu "SELECT DEVICE" in the Programmer tool: | + | # Select the j-link probe from the drop top-left drop-down menu "SELECT DEVICE" in the Programmer tool: [[File:Psd nrf.png|thumb|Select device menu in the Programmer tool]] |
| − | [[File:Psd nrf.png|thumb|Select device menu in the Programmer tool]] | ||
# Click "Add file" and select the modem firmware .zip file. | # Click "Add file" and select the modem firmware .zip file. | ||
# Ensure under "JLINK SETTINGS" on the left hand side that "Auto read memory" and "Auto reset" are both enabled. | # Ensure under "JLINK SETTINGS" on the left hand side that "Auto read memory" and "Auto reset" are both enabled. | ||
# Ensure under "MCUBOOT SETTINGS" on the left hand side that "Enable MCUboot" is enabled. | # Ensure under "MCUBOOT SETTINGS" on the left hand side that "Enable MCUboot" is enabled. | ||
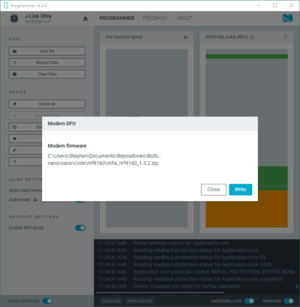
| − | # Click under "DEVICE" on the left hand side click "Write". You should get a popup prompt as per the screenshot. Click "Write". | + | # Click under "DEVICE" on the left hand side click "Write". You should get a popup prompt as per the screenshot. Click "Write". The programming process could take up to a minute [[File:Mdfu.png|thumb|modem firmware update prompt]] |
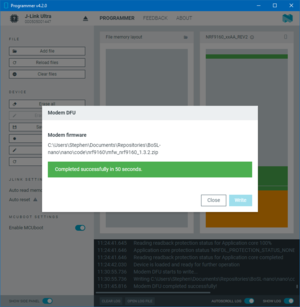
| − | [[File:Mdfu.png|thumb|modem firmware update | + | # On success you will see a screen like the screenshot below. Click "Close". [[File:Mdfu succ.png|thumb|modem firmware update success screen]] |
Revision as of 01:33, 22 April 2024
This page is about how to program the nRF9160 modem firmware.
- Download v1.3.2 of the nRF9160 SiP modem firmware from: [1].
- Download and install nRF connect for desktop available at: [2].
- Open nRF connect for desktop, install and then open the Programmer tool:
- Connect the nRF9160 to the computer via a segger j-link. Ensure that the nRF9160 is powered.
- Select the j-link probe from the drop top-left drop-down menu "SELECT DEVICE" in the Programmer tool:
- Click "Add file" and select the modem firmware .zip file.
- Ensure under "JLINK SETTINGS" on the left hand side that "Auto read memory" and "Auto reset" are both enabled.
- Ensure under "MCUBOOT SETTINGS" on the left hand side that "Enable MCUboot" is enabled.
- Click under "DEVICE" on the left hand side click "Write". You should get a popup prompt as per the screenshot. Click "Write". The programming process could take up to a minute
- On success you will see a screen like the screenshot below. Click "Close".


