Difference between revisions of "Audio Sensor"
| (One intermediate revision by the same user not shown) | |||
| Line 34: | Line 34: | ||
A few more things I want to mention here: | A few more things I want to mention here: | ||
| + | |||
1. A very very big thank you to Stephen for his help! | 1. A very very big thank you to Stephen for his help! | ||
| Line 39: | Line 40: | ||
3. I persaonally do not like this sensor as I don't think the sensor has good quality, and I found a lot of audio sensors in the market, maybe we can use other good brand (SparkFun) ones to test? | 3. I persaonally do not like this sensor as I don't think the sensor has good quality, and I found a lot of audio sensors in the market, maybe we can use other good brand (SparkFun) ones to test? | ||
| + | |||
| + | The following section shows how to change the baud rate of the sensor by using the example code: | ||
| + | |||
| + | Step 1: Connect the aduio sensor to Arduino Uno board which make the communication work. | ||
| + | |||
| + | Step 2: Comment off the 31th line and change the baudrate to 9600 and then upload the code to Arduino Uno, the baud rate of the Audio sensor changed at the same time. | ||
| + | |||
| + | [[File:Example code 1.jpg|400px]] | ||
| + | |||
| + | Step 3: change the baud rate in line 25 to 9600 and then upload the code to a BoSL baord, then change all the baud rate in the code to 9600, then connect the Audio sensor to the BoSL baord, that will make the sensor work. | ||
| + | |||
| + | This also needs longer time test to validate the sensor performance. | ||
Latest revision as of 03:48, 19 February 2024
This page is used for talking about the tests of the audio sensor.
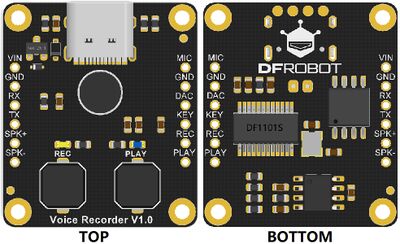
The audio sensor we want to test is DFRobot Voice Recorder V1.0, the link is https://www.dfrobot.com/product-2185.html
From the sensor instructions, it seems that the audio sensor is compatible with Arduino, so we would like to use the BoSL board to control the sensor and applied in some projects. For example, we can implement the audio sensor in the pits for illegal discharge detection project in Stony Creek catchment, the idea is we record the audio every 6 minutes and each time take 500 milliseconds recording. Then we can analyse the audio we recorded and see if we can capture the water flow frequency.
Before 2023 Christmas
We have connected the sensor with BoSL board, VIN connected to 3.3v, GND connected to GND, and we accidently found that when REC is connected to GND, it started to change to Record mode just like press REC button. And when PLAY pin connected to GND, it has the same function as pressing PLAY button. So we thought the easist methond is to connect an Digital pin with the REC pin and PLAY pin, pull them up or down to control that :)
January 2024
We wrote a code for BoSL board which regularly pull up/pull down the pin connected to the audio sensor, tried to make the sensor under BoSL boards control. However, the audio senosr cannot be controlled well, the sensor status ranmondly changed Record mode and Play mode which did not make the sensor work. We thought it was the connection issue of the jumber wire, so we solder wires on the audio sensor pins, that should not have any problem. Same thing happend. And I did not use the BoSL board to control that, just manually use a jumper wire connecting to the GND and try to touch the REC pin on the sensor, it sometimes work and sometimes not work. This method is not stable!
February 2024
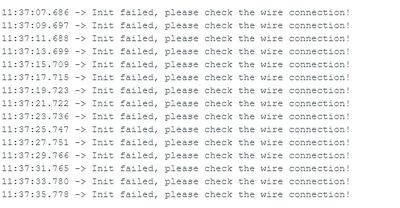
After we found the sensor not working by pulling down the pins to GND, we follow the sensor instructions from the offical website, which using arduion code, installed the library and connected TX and RX pins to control the sensor. However, after we using this method and follow the connections, the sensor did not work. The serial monitor output said "Init failed, please check the wire connection". We checked all the connections, but no problem was found.
Actually we checked everything, all of them look as same as the instrucion says, the only different is we are using BoSL board and the insruction used DFRduino UNO R3, which is very similar to Arduino UNO board, so we replaced the BoSL board to Arduion UNO board, and after we changed that, the audio sensor worked!
I thought maybe because of the AT-mega on the Arduino UNO board is the big one, not the mounted one, so I found a BoSL v0.3 board, this version has big AT-mega chip, but after I changed to BoSL v0.3, it still does not work.
So there are some problem with our current BoSL board. I will talk with the designer.
February 19th
Both Luke and I reported the arduio sensor problem to genius Stephen who designed the BoSL board, he helped to test the sensor with Both BoSL board and Arduino Uno board. First of all, we need to understand that the sensor quality is not good, the sensor we tested last Friday did work with Uno board, now not working for both Uno and BoSL board, the serial monitor keep reporting the connection issue. Maybe because of the jumper wire connection, or the sensor itself has some problems. Anyway, it is very vulnerable product. In this condition, we have to change to another sensor for testing. Same thing happened, Uno can make it work but BoSL can't. Stephen found the baud rate of the aduio sensor itself and communication serial is 115200 which is very high, that may cause the communication failure between the audio sensor and the BoSL board. From the example code, the baud rate can be changed to lower numbers, after we changed it to 9600, it works for both Uno and BoSL baord :), thank goodness for this working sensor, we can have further tests on this sensor.
A few more things I want to mention here:
1. A very very big thank you to Stephen for his help!
2. I need to test the sensor in the lab for a few days and make sure it will work, and then implement it in the field!
3. I persaonally do not like this sensor as I don't think the sensor has good quality, and I found a lot of audio sensors in the market, maybe we can use other good brand (SparkFun) ones to test?
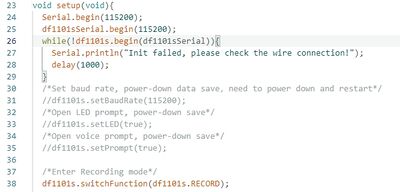
The following section shows how to change the baud rate of the sensor by using the example code:
Step 1: Connect the aduio sensor to Arduino Uno board which make the communication work.
Step 2: Comment off the 31th line and change the baudrate to 9600 and then upload the code to Arduino Uno, the baud rate of the Audio sensor changed at the same time.
Step 3: change the baud rate in line 25 to 9600 and then upload the code to a BoSL baord, then change all the baud rate in the code to 9600, then connect the Audio sensor to the BoSL baord, that will make the sensor work.
This also needs longer time test to validate the sensor performance.


